STEP 1
(All Shades)
Use template to create pilot holes.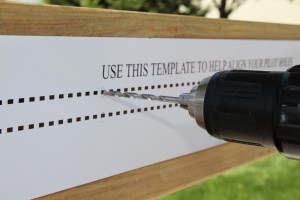
STEP 2
(Valanced Shades Only)
Install shade brackets.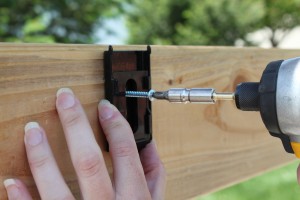
STEP 3
(Valanced Shades Only)
Click shade into place.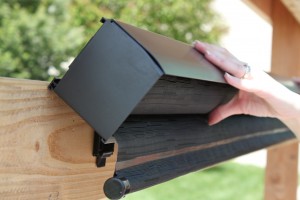
(Applies to Diamond Plus, Titanium Plus, and Elite Plus shades):
Our brackets can be installed anywhere along the length of the valance. This means you increase your chances of finding a wood stud (if you so choose). Mounting the valance into wood is more secure…and it decreases the likelihood of messing with anchors, which can loosen over time and do not provide a worry free mounting.
All of our shades include a paper template which helps customers keep the pilot holes straight. This eliminates the need to measure and ensures you are able to hang the shade level.
Many of our competitors’ brackets are shipped as wall ready and require work to change the brackets for a ceiling installation. Not ours….our brackets are thoughtfully designed to be used for both ceiling and wall installations….no changes are needed to the brackets.
Easy up, easy down: the fact that the valance simply “clicks” onto the brackets means that the shade is not only easy to install….it is also easy to take down. This allows customers to take the shades down during winter if desired, quickly and easily move the shades to a different location (requires the purchase of additional brackets) or remove the shade to paint/clean your home (Valance Only).